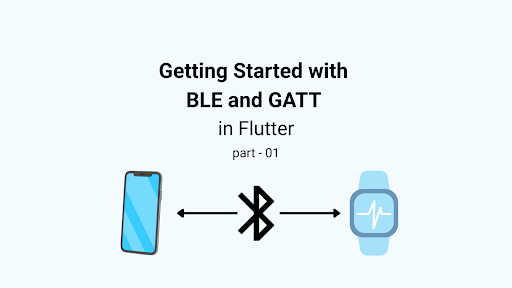
Ever wondered how your smartwatch sends your heart rate to your phone without killing its battery? That’s the magic of Bluetooth Low Energy (BLE) and with Flutter, you can bring that same power to your own apps. In this blog, we’ll walk through the essentials of BLE and GATT so you understand exactly how your Flutter app can discover, connect, and exchange data with low-power devices.
So what is BLE anyway?
Think of Bluetooth Low Energy (BLE) as Bluetooth’s younger, more energy-conscious sibling. It’s built for devices that don’t need to chat constantly, just send tiny pieces of data every now and then, then go back to sleep. That’s how your fitness tracker lasts for days or even weeks without needing a recharge.
BLE is used in all kinds of everyday tech:
- Your smartwatch syncing heart rate or steps
- Smart home sensors that quietly track temperature or motion
- Tiny retail beacons that send you a discount when you walk by
- Health devices like glucose or oxygen monitors
Basically, if it talks to your phone and runs on a small battery, there’s a good chance BLE is behind it.
And as Flutter devs, BLE opens a door. It lets our apps talk to the physical world, not just the screen. Imagine building an app that interacts with your environment in real time. That’s what BLE makes possible.
Lets talk GATT, The real MVP of BLE
If BLE is the language your smartwatch and phone use to talk, GATT (Generic Attribute Profile) is the grammar, it sets the rules for how that data gets exchanged.
But instead of diving into formal definitions, here’s a quick analogy:
Imagine GATT like a restaurant menu.
- Each section of the menu is a Service (like “Drinks” or “Main Course”)
- Each item inside a section is a Characteristic (like “Iced Tea” or “Grilled Chicken”)
When a BLE device connects, it doesn’t just shout random data. It serves up Services and Characteristics in a structured way and your app picks what it wants to order (or update).
Now for Structure
Services
A Service is a group of related data. Each has a unique ID (called a UUID). BLE defines some official ones (with 16-bit IDs), but you can also create custom ones (128-bit UUIDs).
Example:
The Heart Rate Service (UUID 0x180D) includes:
- Heart Rate Measurement
- Body Sensor Location
- Heart Rate Control Point
Characteristics
Each Characteristic is a chunk of actual data. Think of it like a dish on the menu. It’s what your app actually reads from or writes to.
For example, that Heart Rate Measurement includes:
- An 8-bit flag that describes the format
- The actual heart rate value itself
Depending on how a characteristic is set up, your app can:
- Read it
- Write to it
- Subscribe for updates (via Notify or Indicate)
Profile
A BLE Profile is basically a blueprint that says:
“Hey, if you want to support a heart rate monitor, you’ll need these specific services, no more, no less.”
It’s not something stored on the device like data, it’s more like a design guide that makes sure all devices meant for the same job work the same way.
Example: The Heart Rate Profile
This one includes:
- The Heart Rate Service (to send actual heart rate data)
The Device Information Service (to share details like model number, manufacturer, etc.)
By sticking to the same profile, BLE devices and apps can instantly understand each other like they’re speaking the same dialect of Bluetooth.
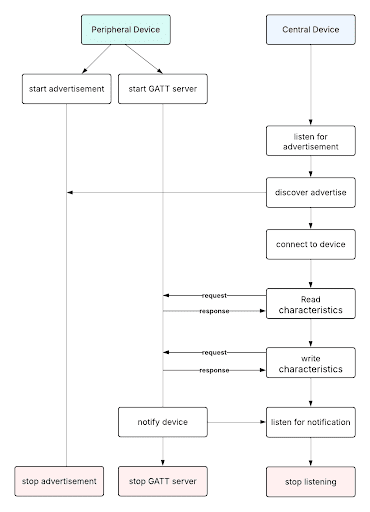
Who is talking? Who is listening?
In any Bluetooth Low Energy (BLE) setup, there are always two roles and knowing which one your device plays is key.
Peripheral = food stall: A small vendor puts up a sign, “Hot chicken fry here!”
Central = customer: They walk around, notice the sign, and decide which stall to approach.
- The Peripheral is a small, low-power device. It advertises that it’s around and has data to share, like a fitness tracker saying, “Hey! I’ve got your heart rate info!”
- The Central is usually your phone, tablet, or computer. It scans the area for these signals and decides who to connect to and what data to read.
What about Flutter?
Yep, your Flutter app can act as either one, central or peripheral, depending on the platform (Android/iOS) and which plugin you’re using.
Most apps you’ll build will act as a central, connecting to external BLE devices and reading their data.
But in some use cases (like creating a custom IoT device), you might want your app to act as a peripheral, advertising its own data to other devices.
GATT Server vs GATT Client
Wait!!!!!!!!! There’s a server and a client too?
Yep! Once two BLE devices connect (Central and Peripheral), they shift into a more specific relationship, GATT Client and GATT Server.
Let’s stick with the concert metaphor:
The Peripheral (the food stall) becomes the GATT Server. It’s got the goods ready (like heart rate, temperature, etc.) and serves them up when asked.
The Central (the customer) becomes the GATT Client. It walks up to the stall, connects, and says, “Hey, what’s today’s special?” or “Keep giving me one chicken fry every 5 minutes”
Role | What it does | Usually who? |
GATT Server | Stores and shares the actual data (via Characteristics inside Services) | The Peripheral |
GATT Client | Connects, requests, or writes data | The Central |
Why does this matter for Flutter devs?
If you’re building a Flutter app that connects to, say, a BLE thermometer your app is acting as the GATT Client. It’s asking the device (server) for data.
But if your app is the one providing the data (maybe simulating a heart rate monitor), then it’s the GATT Server.
Knowing which role your app plays tells you:
- Which plugins to use
- What API calls to make
- How to design your Services and Characteristics
DATA Flow
Flutter plugin options
1. Flutter_blue_plus (a central package):
2. Flutter_ble_peripheral (a peripheral package):
3. Ble_peripheral (a peripheral package):
Permission for BLE in Flutter
Before your Flutter app can scan or connect to BLE devices, it needs permission. Not just out of politeness, the OS literally won’t let you touch Bluetooth without it.
For Android (in AndriodManifest.xml)
					<!-- Allow Bluetooth -->
<uses-feature android:name="android.hardware.bluetooth_le" android:required="true" />


<!-- New Bluetooth permissions in Android 12
https://developer.android.com/about/versions/12/features/bluetooth-permissions -->
<uses-permission android:name="android.permission.BLUETOOTH_SCAN" android:usesPermissionFlags="neverForLocation" />
<uses-permission android:name="android.permission.BLUETOOTH_CONNECT" />


<!-- legacy for Android 11 or lower -->
<uses-permission android:name="android.permission.BLUETOOTH" android:maxSdkVersion="30" />
<uses-permission android:name="android.permission.BLUETOOTH_ADMIN" android:maxSdkVersion="30" />
<uses-permission android:name="android.permission.ACCESS_FINE_LOCATION" android:maxSdkVersion="30"/>


<!-- legacy for Android 9 or lower -->
<uses-permission android:name="android.permission.ACCESS_COARSE_LOCATION" android:maxSdkVersion="28" />
For IOS (in Info.plist)
					<key>NSBluetoothAlwaysUsageDescription</key>
<string>This app uses Bluetooth to connect to nearby devices.</string>
At Runtime you must request BLUETOOTH_SCAN, BLUETOOTH_CONNECT, and (if you didn’t use neverForLocation) ACCESS_FINE_LOCATION.
Your First BLE Scan in Flutter
Alright, you’ve got the concepts.
You’ve got the permissions.
Now it’s time to actually see some Bluetooth magic happen.
We’ll use the flutter_blue_plus package, a popular and well-supported plugin that makes BLE in Flutter surprisingly simple.
What we’re about to do:
You’re going to scan for nearby BLE devices.
Your app will:
- Turn on BLE
- Look for advertising devices nearby (like sensors, beacons, etc.)
- Show them in the on screen
Think of it like opening your ears and saying, “Hey, who’s out there?”
Your Playground: Sample BLE Scan Code
import 'dart:async';


import 'package:flutter/material.dart';
import 'package:flutter_blue_plus/flutter_blue_plus.dart';


class BleScanner extends StatefulWidget {
 const BleScanner({super.key});


@override
 State<BleScanner> createState() => _BleScannerState();
}

class _BleScannerState extends State<BleScanner> {
 final List<ScanResult> scanResults = [];
 StreamSubscription<List<ScanResult>>? _scanSubscription;

Future<void> startScan() async{
   FlutterBluePlus.stopScan();
   _scanSubscription?.cancel();
 await FlutterBluePlus.startScan(timeout: const Duration(seconds: 5));


   _scanSubscription = FlutterBluePlus.scanResults.listen((results) {
     if (!mounted) return;
     setState(() {
       scanResults
         ..clear()
         ..addAll(results);
     });
   });
 }

@override
 void initState() {
   super.initState();
   startScan();
 }

 @override
 void dispose() {
   FlutterBluePlus.stopScan();
   _scanSubscription?.cancel();
   super.dispose();
 }

 @override
 Widget build(BuildContext context) {
   return Scaffold(
     appBar: AppBar(title: const Text("BLE Scanner")),
     body: ListView.builder(
       itemCount: scanResults.length,
       itemBuilder: (context, index) {
         final result = scanResults[index];
         final deviceName = result.device.platformName.isNotEmpty
             ? result.device.platformName
             : "Unknown Device";
return ListTile(
           title: Text(deviceName),
           subtitle: Text(result.device.remoteId.toString()),
         );
       },
     ),
     floatingActionButton: FloatingActionButton(
       onPressed: startScan,
       child: const Icon(Icons.search),
     ),
   );
 }
}
What’s Next?
You’ve just unlocked the basics of BLE and GATT, the building blocks every Flutter developer needs to connect with the Bluetooth world.
Next up, we’re going to do some cool stuff:
- Listen in on data from a BLE peripheral (think of it like eavesdropping on your heart rate monitor)
- Flip the script and turn your phone into a sensor, sending out its own BLE signals
We’ll try both sides of the Bluetooth game, so get ready to level up your Flutter skills!