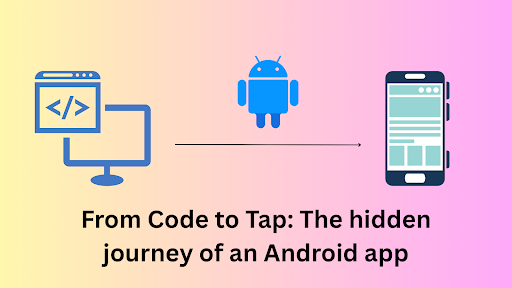
Android’s user interface framework is a marvel of engineering, enabling millions of apps to create dynamic, interactive, and visually stunning experiences. At its heart lies the View system, responsible for rendering every button, text, and animation you see on the screen. But how does this intricate process work under the hood?
This article takes you on a journey through Android’s view rendering process, exploring its lifecycle, the rendering pipeline, optimizations, and practical insights for developers.
Imagine you’re at a grand concert where every musician plays in perfect harmony to create a mesmerizing melody. In the world of Android rendering, this orchestra is made up of components like the Choreographer, vsync signals, Surface Flinger, and more. Each plays its part, ensuring the magic of fluid animations and responsive interfaces unfolds before your eyes.
The Beginning: Choreographer as the Conductor
The story begins with the Choreographer, the maestro of the rendering symphony. Every frame you see on an Android device starts here. The Choreographer coordinates input events, animations, and screen drawing. It waits for a vsync signal—a periodic pulse that tells the device it’s time to draw the next frame.
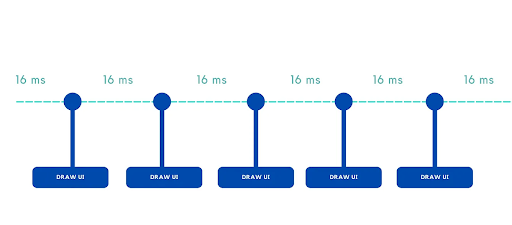
In this concert, the velocity is 60 beats per second. That means the Choreographer has a mere 16 milliseconds to prepare and render each frame. If it misses this deadline, the performance stutters—resulting in visible lag or dropped frames.
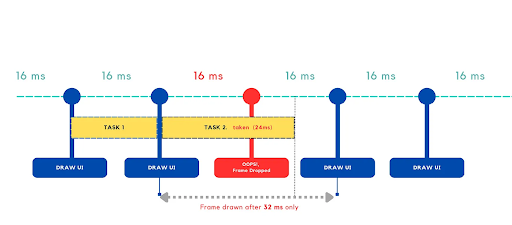
(60FPS -> 1000ms/60 = 16.67ms ~ 16ms)
- Android will render the UI in 60FPS, which means the UI will be updated every 16.67 milliseconds. ~roundly (16 ms)
- Any operation or logic will have to be completed within 16ms so that it can be updated to the UI smoothly.
- If a task takes more than 16ms on the main thread, leads to a frame drop and the app will be lagged.
Vsync: The Timekeeper
The vsync signal acts as the measuring scale of this orchestra, keeping everything in sync. It is issued by the display hardware, marking the start of a new frame. The Choreographer listens to this signal and springs into action, orchestrating the various tasks that need to happen before the screen is refreshed.
The Players: Input, Animation, and Drawing
Once the Choreographer receives the vsync signal, it divides its responsibilities:
- Input Handling: It processes touch or gesture inputs, preparing the data to be fed into the app.
- Animation: Animations registered with the Choreographer are updated. These could be button fades, list scrolls, or other UI transitions.
- Drawing Commands: Finally, the UI framework generates drawing commands. It calculates what needs to be shown on the screen and sends these instructions to the GPU.
GPU and RenderThread: Painting the Canvas
Enter the RenderThread, an unsung hero that runs parallel to the main thread. The RenderThread collects drawing commands and sends them to the GPU, which performs the heavy lifting of transforming these commands into pixels on the screen.
The GPU executes a process known as rasterization. Each UI element—a button, an image, or text—is represented as a vector path or texture. The GPU converts these high-level instructions into discrete pixels, determining the exact color and brightness of each pixel.
These rendered pixels are stored in a framebuffer, a block of memory that temporarily holds the image for the current frame.
Surface Flinger: The Final Act
Once the GPU completes its work, the Surface Flinger takes center stage. Think of it as the stage manager who assembles all the performers before the curtain rises.
The Surface Flinger combines the framebuffers of all visible apps and system components into a single composite image. This involves layer composition, where overlapping layers (like a dialog box over a background) are blended together.
The final composite image is handed over to the display hardware, where it is sent to the screen for the user to see.
Pixels on the Screen: The Magic of Light
Once the Surface Flinger finishes its work of assembling all the frames, it hands the final composite image over to the display hardware. This is where the magic of rendering pixels truly happens—converting digital data into the vibrant, colorful visuals you see on your screen.
Your screen is made up of millions of tiny dots called pixels, and each pixel is composed of three even tinier lights: one red, one green, and one blue. These are known as sub-pixels. By adjusting the brightness of each sub-pixel, the display can create millions of colors.
The display hardware takes the composite image from the framebuffer and sends it to the screen’s pixels—tiny RGB (red, green, blue) sub-pixels. These sub-pixels work together to create the desired color for each pixel on the screen.
The display panel’s refresh cycle ensures that these pixels are updated at a steady rate—typically 60 times per second. Each frame lights up the screen, bringing the Android UI to life.
How Pixels Bring Images to Life
Let’s break it down step by step:
- The Framebuffer’s Role
The framebuffer, which holds the final composite image created by the GPU and Surface Flinger, acts like a digital canvas. It contains the exact color values for every pixel that will appear on your screen.
Each pixel in the framebuffer is represented by a combination of red, green, and blue intensity levels. For example:- A bright white pixel has all sub-pixels at full brightness.
- A deep blue pixel has only the blue sub-pixel lit up, while the red and green remain off.
- The Refresh Cycle
Your screen operates at a specific refresh rate, typically 60 Hz. This means the display refreshes itself 60 times per second, continuously pulling the pixel data from the framebuffer.
Imagine a painter quickly painting the same picture over and over, ensuring it looks smooth and fluid even as parts of it change slightly—like a moving animation or scrolling text. - How Colors Are Generated
Each pixel’s color is created by blending light from its red, green, and blue sub-pixels. This process is called additive color mixing.- Want a yellow pixel? Light up the red and green sub-pixels.
- Need a purple hue? Combine red and blue.
- A completely black pixel? Keep all sub-pixels off.
- By controlling the brightness levels of the sub-pixels, the display can recreate the exact colors specified by the framebuffer.
- The Role of Backlight (in LCDs)
For many screens, especially LCDs, there’s a backlight that shines through the pixels. The sub-pixels act like tiny shutters, opening or closing to let specific amounts of light through.
On OLED or AMOLED screens, the pixels themselves emit light directly, creating brighter colors and deeper blacks without needing a backlight.
The Challenge: Staying in Rhythm
The Android rendering pipeline’s ultimate goal is to hit the 60 FPS mark without missing a beat. Missing the 16 ms window means skipping a frame, leading to a jarring experience for the user. Factors like heavy animations, complex layouts, or background processing can disrupt this delicate rhythm.
The Grand Finale
When everything works perfectly, the result is a seamless and delightful experience. The Choreographer, vsync, RenderThread, GPU, Surface Flinger, and the display panel all play their parts, ensuring the user sees a smooth, responsive interface.
So, next time you scroll through an app or watch an animation unfold, remember the orchestra behind the scenes, tirelessly working to bring your screen to life—pixel by pixel.
Conclusion
Rendering in Android is a fascinating blend of engineering and artistry. From the intricacies of the view lifecycle to the optimizations in the rendering pipeline, understanding this process empowers developers to craft highly performant and visually captivating applications. Whether you’re working with traditional views or exploring Jetpack Compose, the principles of efficient rendering remain indispensable.